How To Use Your Online Portal
Thank you for activating your customer Online Account in your Online Portal! Since we’ve recently upgraded our systems, we understand that some features may not be exactly as you remember them. Below are some instructions and tips on how to use your new Online Account. As always, you can contact us at any time if you have questions!
Topics:
Click on one of the topics below to view instructions.
Make a Payment:
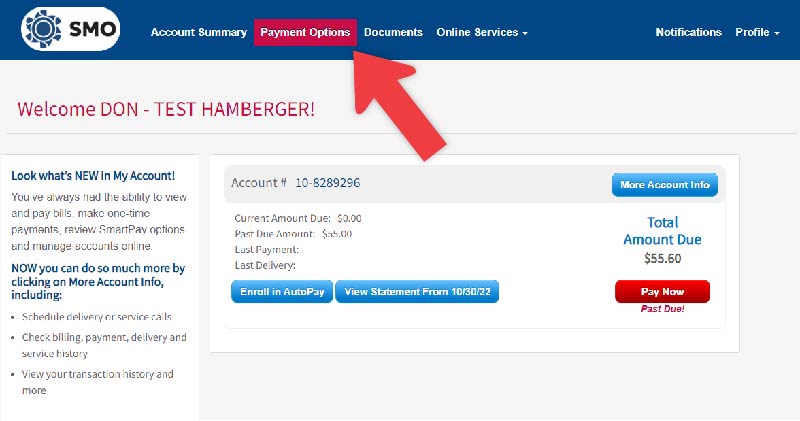
- At the top of the main screen, click Payment Options.
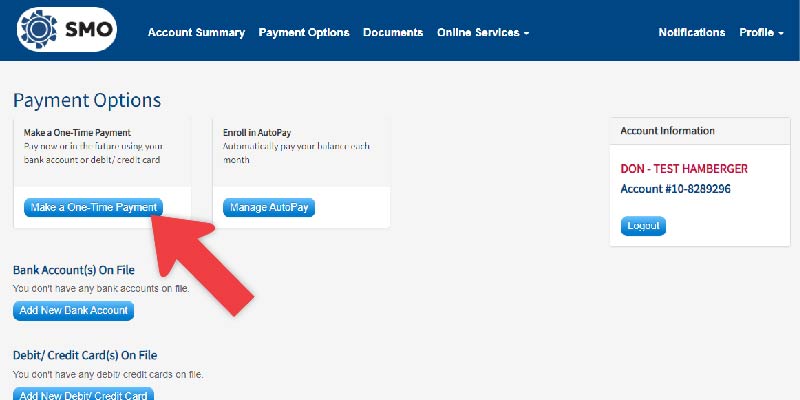
- On the Payment Options screen, click the blue button that says Make a One-Time Payment.
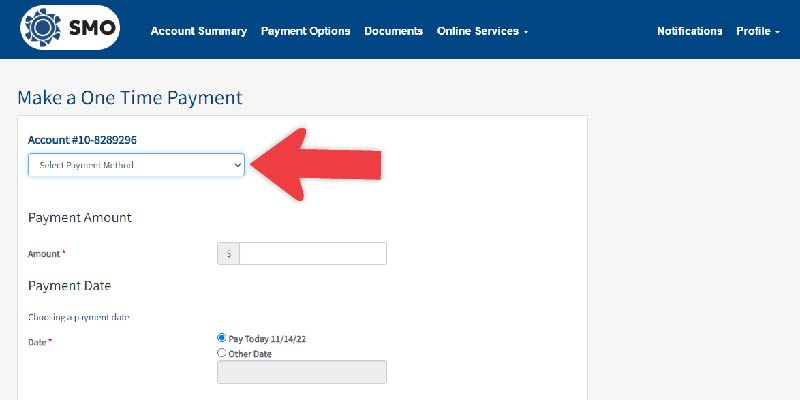
- Select a Payment Method from the drop down list. In this dropdown, you’ll also have the option to add a new payment method. Note: if you’re adding a new payment method, you must check the box that says Save credit card information for future use to process the payment successfully.
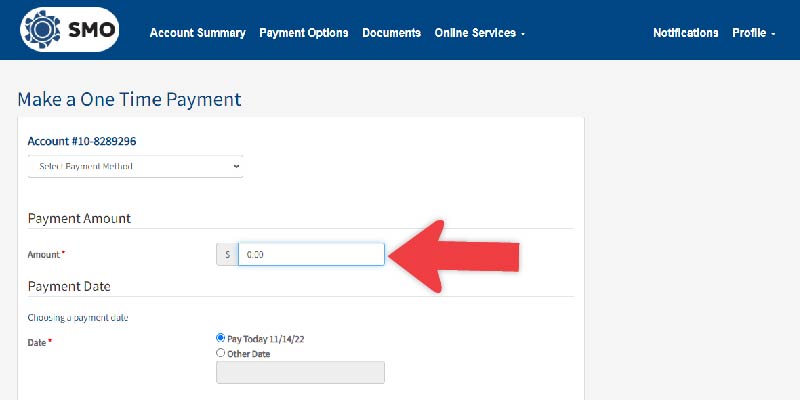
- Input the amount of your payment in the Amount box.
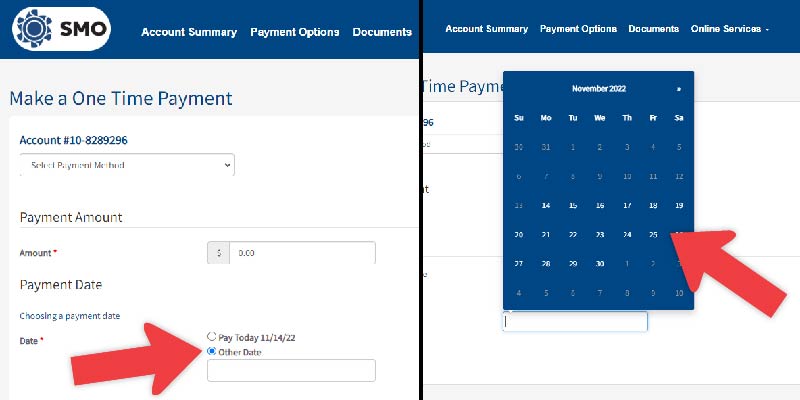
- The Payment Date will default to Today. If you would like to schedule your payment for a future date, click the Other Date option and select a date from the calendar.
- Click the Continue button to process your payment.
- Click on Yes, Complete This Payment.
- You will receive a Success confirmation message when your payment has been completed.
- At the top of the main screen, click Payment Options.
2. On the top of the Payment Options screen, click the blue button that says “Make a One-Time Payment.”
3. Select a Payment Method from the drop down list. In this dropdown, you’ll also have the option to add a new payment method.
Note: if you’re adding a new payment method, be sure to check the box that says “Save credit card information for future use.”
4. Input the amount of your payment in the Amount box.
5. The Payment Date will default to Today. If you would like to schedule your payment for a future date, click the Other Date option and select a date from the calendar.
6. Click the Submit button to process your payment.

Create a Recurring Payment Subscription:
- On your Account Summary screen; scroll down to Recurring Payment Subscriptions and click on Setup Recurring Payments.
- If you have multiple accounts linked, choose the correct account number from the Account drop down list.
- Select a Payment Method.
- Input the dollar amount of your recurring payment in the Amount box.
- Select the Schedule (when do you want the payments to occur).
- Select a Starting date and an Ending date.
- Click on Submit.
- Review what you are about to schedule. To schedule, click on Yes, Create This Recurring Payment.
- You will receive a green Success confirmation.
Edit a Recurring Payment Subscription:
- On your Account Summary screen, scroll down to Recurring Payment Subscriptions and click on Edit Subscription next payment series you would like to edit.
- You will be able to edit the Next Charge date, the Amount, and/or the Ending date.
- Click on Submit when you are finished making your edits.
- Review your changes, click on Yes, Save This Recurring Payment if everything looks correct.
- You will receive a green Success confirmation.
Cancel a Recurring Payment Subscription:
- On your Account Summary screen, scroll down to Recurring Payment Subscriptions.
- Click on Cancel Subscription next to the recurring payment series you’d like to cancel.
- You will receive a green Success message to confirm it has been cancelled.
Access Documents:
- On the Account Summary screen; click on Documents in the top menu.
- You’ll see a full list of all documents on your account.
- Click on View next to each document title to download and view the full document.
Enroll in AutoPay:
- On your Account Summary screen, click the blue button that says Enroll in AutoPay.
- In the Payment Method dropdown, select the payment method you would like to use.
- Read the terms and agreement, and check the I agree box to continue.
- In the Timing section, choose the date of each month you’d like your payment to occur.
- Set the Maximum Amount for Autopay to Yes, or enter a dollar amount to be paid each month. Note: we recommend select the Maximum Amount for Autopay option to ensure you don’t get behind on payments.
- Click the blue Enroll button.
- You will receive a green Success confirmation message.
Cancel AutoPay:
- On your Account Summary screen, click Payment Options at the top of the screen.
- Click the blue Manage AutoPay button.
- Click on the Select button (this will bring you to the Billing Accounts screen).
- Change the AutoPay Status to Off.
- Click on Submit to save.
- You will receive a green Success confirmation.
Cancel a Payment:
- On your Account Summary screen; scroll down to Scheduled Payments.
- Click on Cancel Payment in red.
- You will receive a green Success confirmation
Add a New Payment Method:
- On your Account Summary screen, click on Payment Options at the top.
- Depending on which type of payment method you’d like to add, click one of the blue buttons that say Add New Bank Account or Add New Debit/Credit Card.
- Fill out all required fields (required fields are marked with a red star).
- Click on Save Payment Method to save.
- You will receive a green Success confirmation.
Delete a Payment Method:
- On your Account Summary screen, click on Payment Options at the top.
- Scroll down to Payment Methods
- Click on Delete next to the payment method you want to delete.
- Click on Yes to continue.
- You will receive a green Success confirmation.
Reset Your Password:
- On your Account Summary screen; click on Profile in the top right corner.
- From the dropdown, select Change Password.
- Enter your current password, new password (twice to verify), and then create a hint for your new password to help you remember it.
- Click the blue Submit button.
Create Your Online Portal Account:
- At the top of the SMOenergy.com website, click the button that says Client Login.
- When the Client Portal opens, click the gray Sign Up button.
- Fill out all of the required fields (marked with a red star).
- At the bottom of the screen, make sure you check the box next to Yes, I accept the Terms of Use.
- Click the blue Enroll Now button.
